Prerequisites
In the InfoObject maintenance, the indicator with hierarchies is set for the relevant characteristic, meaning that the characteristic can have hierarchies.
Procedure
Step 1: Select the InfoObject tree in the Administrator Workbench.
If you have assigned the characteristic to an InfoObject catalog, select the corresponding InfoObject catalog for an InfoArea.
If the characteristic does not belong to an InfoObject catalog, select the Not Assigned Nodes InfoArea and the Not Assigned Characteristics InfoObject catalog.
Step 2:Select the characteristic for which you want to create a hierarchy, choose the context menu with the right mouse button, and then Create hierarchy.
Step 3:In the dialog box, enter the technical hierarchy name, or the hierarchy version if applicable, the time-reference, and at least one short description of the hierarchy. Confirm your entries. You come to the screen Maintain hierarchies. You can now define your hierarchy here.
Creating Nodes and Leaves
Step 4:Select the root and choose Edit ® Create nodes. Give the node a technical name and at least one short description.
Select a node that does not represent a value interval, and create a child node for it, or choose Edit ® Insert. You now see a list of the Characteristic values and can select one single value or various single values.
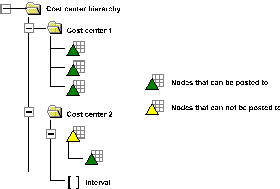
These InfoObjects deal with chargeable nodes. These are symbolized by the green InfoObject icons
If you want to include external InfoObjects in the hierarchy, you can do this using right mouse button ® Insert nodes for characteristic, or Characteristic in the menu toolbar.
These InfoObjects deal with non-chargeable nodes. These are symbolized by the green InfoObject icons.
If the hierarchy is allowed to involve intervals, then go to Right mouse button ® Create intervals, or Interval in the menu toolbar. Specify (for example, with input help), the value interval.
You can create intervals anywhere, even under chargeable nodes.
A hierarchy node, which represents a value interval, is an end node and cannot have child nodes.
Step 5:Repeat these steps until you have created all the nodes and the leaves.
To display, change, or delete nodes or leaves from the hierarchy, place the cursor on the node/leaf to be deleted, and choose Edit ® Change, display, delete nodes.

Saving and activating hierarchies
Save the hierarchy.
With the right mouse button, choose Activate hierarchy
In the InfoObject maintenance, the indicator with hierarchies is set for the relevant characteristic, meaning that the characteristic can have hierarchies.
Procedure
Step 1: Select the InfoObject tree in the Administrator Workbench.
If you have assigned the characteristic to an InfoObject catalog, select the corresponding InfoObject catalog for an InfoArea.
If the characteristic does not belong to an InfoObject catalog, select the Not Assigned Nodes InfoArea and the Not Assigned Characteristics InfoObject catalog.
Step 2:Select the characteristic for which you want to create a hierarchy, choose the context menu with the right mouse button, and then Create hierarchy.
Step 3:In the dialog box, enter the technical hierarchy name, or the hierarchy version if applicable, the time-reference, and at least one short description of the hierarchy. Confirm your entries. You come to the screen Maintain hierarchies. You can now define your hierarchy here.
Creating Nodes and Leaves
Step 4:Select the root and choose Edit ® Create nodes. Give the node a technical name and at least one short description.
Select a node that does not represent a value interval, and create a child node for it, or choose Edit ® Insert
These InfoObjects deal with chargeable nodes. These are symbolized by the green InfoObject icons
If you want to include external InfoObjects in the hierarchy, you can do this using right mouse button ® Insert nodes for characteristic, or Characteristic in the menu toolbar.
These InfoObjects deal with non-chargeable nodes. These are symbolized by the green InfoObject icons.
If the hierarchy is allowed to involve intervals, then go to Right mouse button ® Create intervals, or Interval in the menu toolbar. Specify (for example, with input help), the value interval.
You can create intervals anywhere, even under chargeable nodes.
A hierarchy node, which represents a value interval, is an end node and cannot have child nodes.
Step 5:Repeat these steps until you have created all the nodes and the leaves.
To display, change, or delete nodes or leaves from the hierarchy, place the cursor on the node/leaf to be deleted, and choose Edit ® Change, display, delete nodes.

Saving and activating hierarchies
Save the hierarchy.
With the right mouse button, choose Activate hierarchy
Comments